


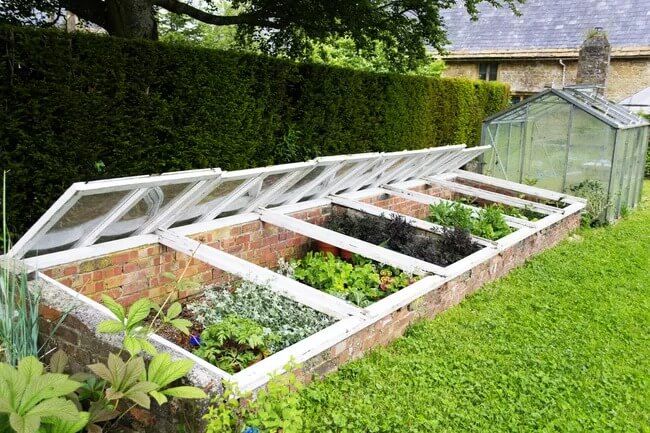
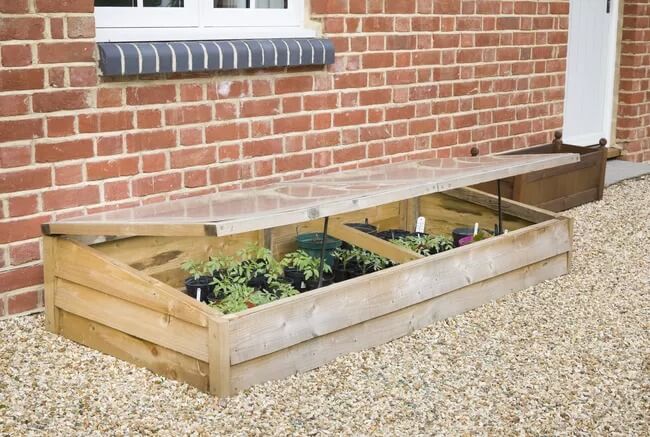
A cold frame is a small box with a glass cover that allows you to extend the growing season of many vegetables, even in some of the coldest climates. You can purchase cold frames online for a few hundred dollars, but the simplest DIY construction described below is a bottomless wooden box covered with glass, that will cost you $20-$40.
- Working Time: 3 hours
- Total Time: 4 hours
- Skill Level: Beginner
- Estimated Cost: $20-40
A cold frame works by moderating temperatures within its microclimate. What kills tender herbs or vegetables is the alternation between freezing and thawing. Covering plants with a cold frame reduces the extremes, allowing you to extend the growing season and keep plants hibernating and ready for harvest throughout the winter.
Once completing this simple DIY gardening project, you’ll be doing the planet a favor by not relying on foods that need to be flown in from thousands of miles under refrigeration so that you can eat them off-season. The average Welsh onion (a kind of scallion) travels 5,900 miles from where it is harvested to a Londoner’s plate. It is only around 150 miles from Wales to London, but Welsh onions are primarily grown not in Wales but in Thailand. With a cold frame, you can grow them year-round just outside our back door, reducing food miles to food feet.
Tips on Materials
- Rot-resistant lumber like cedar or redwood is preferable, but pine or spruce will last many years. Do not use pressure-treated wood.
- Make sure any repurposed wood window frame is free of lead paint.
- Alternatives to lumber: repurposed sandbox, concrete blocks, bricks, bales of hay, or nearly anything at hand that will retain warmth and support a window frame.
- Purchase lumber sufficient to provide four sides that will match the height and width of your chosen window frame. (We will use a standard wooden window frame of 36″ by 54”.) Note that the front and back walls will be 1 ¾ inches longer on each end once the side walls are attached.
- You can find old wooden frames on craigslist or at a store that sells repurposed household goods.

What You’ll Need
Tools
- 1 saw
- 1 drill and bits
Fasteners
- 24 2” exterior screws, such as deck screws
- 2 3” corrosion-free hinges
Lumber
- 1 2” x 8” x 51” board for front wall
- 1 2” x 12” x 51” board for back wall
- 2 2” x 12” x 36” boards for side walls
- 1 repurposed window frame with glass
Instructions
01. Measure Boards
For each of the 36-inch boards, with a carpenter’s pencil, mark the 8-inch width (not length) of the side walls.
02. Draw a Diagonal Line
Draw a diagonal line from one corner of the other end of each side wall to the 8-inch mark.
03. Cut the Side Walls
Cut the side walls lengthwise along the diagonal lines. The result should be two side walls that are 12-inch wide on one end and 8-inch wide on the other.
04. Arrange Frame
Arrange the four walls on a flat surface in the shape of a box. Make sure the side walls rest outside the front and back walls rather than the reverse. Use a wooden block or brick to prop up each board.
05. Pre-Drill
Pre-drill 3 holes at the end of each side wall through to the end of the front wall or back wall.
06. Complete Assembly of Frame
Using exterior screws, complete the assembly of the frame at each corner.
07. Prepare Window Frame
Using exterior screws, attach 2 hinges onto the window frame, making sure that the desired side of the window will be facing up when attached.
08. Lay Window Frame on Base
Lay the window frame onto the base of the cold frame.
09. Attach Hinges
Using screws, attach the hinges to the back wall.
10. Position Cold Frame Base
Place your cold frame base near a south-facing exterior wall. The wall will radiate heat onto the cold frame and offer wind protection.
11. Fill With Soil and Start Planting
Fill your completed cold frame with soil. Plant seeds or seedlings.

Tips for Using a Cold Frame
- Cold-season crops work best in a cold frame. Try leafy greens like spinach, collards, lettuce, arugula, and kale, root vegetables like radishes, carrots, and turnips, or bulbs in the allium family like onions, chives, leeks, shallots, garlic, and maybe even Welsh onions.
- A cold frame can protect your crops all the way down to Zone 3, though in the coldest zones your crop choice may be limited to the most cold-hardy, such as Russian kale.
- A cold frame can raise the temperatures 20 degrees F over the outside temperature, so be sure to vent your cold frame so that you don’t cook your plants before you even get to harvest them. Just lift up the window on its hinges and place any sturdy 1-inch-thick object between the cold frame and each side of the window to let excess heat escape.
- Plant your seeds or seedlings in late summer or early fall. Plant growth will slow down as the days get shorter and winter approaches.
- Provide regular sprinklings of water throughout the fall until the growing season ends, then don’t water again until spring.
- Winter is for harvesting, not gardening. When the growing season ends, it’s over as well for weeds and pests, so cold frames require little maintenance.
- You can use your cold frame in late winter or early spring to extend the growing season as well.
Frequently Asked Questions
Why is pressure-treated wood not recommended for cold frames?
Intended to extend the life of the wood, pressure-treated wood is infused with chemicals. Prior to 2006, pressure-treated wood was treated with arsenic. More recently, pressure-treated lumber is often treated with copper to extend its life. For edible garden applications, choose wood that is untreated and free of chemicals.
What is the difference between a cold frame and a greenhouse?
The key difference between a cold frame and a greenhouse is that a cold frame uses the sun as a heat source whereas a greenhouse is temperature regulated.